
Macrame Hanging Bags
Macrame Hanging Bags


These intricate macrame bags are the perfect way to store glass bottles, fruit, or vegetables in your kitchen. The kit includes enough cording to make 3 bags. Additional household items you'll need: scissors, measuring tape, comb and command hooks to hang them when you are done. Let’s get started!
Step-by-Step Instructions
Hints and Tips:
- This kit has materials and instructions to make three bags, each with a different design. Make one of each or choose your favorite style and make all the same.
- When measuring, do not pull the cord super tight, but leave it relaxed. Try for accuracy, but do measure a little toward the long side rather than on the short side of things. For a uniform look, tie in a consistent manner.
- Tie knots firmly, but gently enough so the cord maintains its shape. Pull evenly with both cord ends. Nest knots snugly without crowding.
- Please review all instructions before beginning. Have fun!
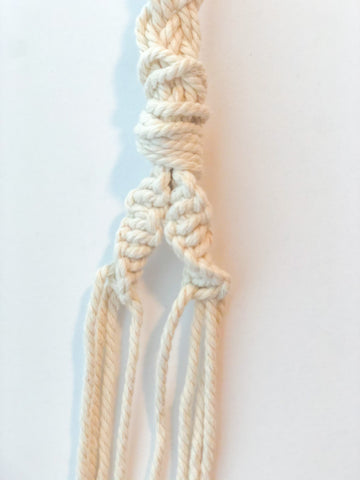
Bag Style 1:
1. Cut eight pieces of cord, each measuring 8 ft. (2.5 mm) in length. Hold all eight cords even at one end and tie an overhand knot, but before tightening it, check to be sure that the ends will measure about 33 inches from the knot. (Adjust the length of the braid if necessary).

2. Use four strands from one end, and tie a double knot 2 inches (5 cm) from the overhand knot. Repeat with four cords on the other end of the braid. Bend the braid in half, to bring the overhand knots together. Using two strands from each side, tie a double knot 2.5 in (6 cm) from the overhand knots. Repeat with the remaining four strands.

3. Hang the piece on a doorknob or other fixed object to make it easier to work. Take two cords from each of two adjacent knots from step 2 and make a double knot centered 1.75 in (45 mm) below. Repeat with the other three sets of cords, working around this piece.
4. Repeat rows of four double knots as in step 3, three more times.

5. Neatly gather all strands together and make an overhand knot, centered about 2 inches (5 cm) below the last row of double knots.
6. Trim cords to the desired length. Comb cord ends for a soft, fringed look.

Bag Style 2:
1. Repeat step 1 from bag style 1.
2. Use four strands from one end and tie three double knots, starting 1 in. (25 mm) from the overhand knot. Repeat with four cords on the other end of the braid. Bend the braid in half to bring the overhand knots together. Using two strands from each side, tie a double knot 2.5 in (6 cm) from the over hand knots. Repeat with the remaining four strands.

3. Hang the piece on a doorknob or other fixed object to make it easier to work. Take two cords from each of the two adjacent koots from step 2 and make three double knots centered 1.5 in (4 cm) below. Repeat with the other three sets of cords, working around the piece.
4. WIth two cords from each adjacent knot from step 3, tie a double knot centered 1 in. (25 mm) below.
5. With two cords from each adjacent knot from step 4, tie three double knots centered 1 in. (25 mm) below.
6. With two cords from each adjacent knot from step 5, tie a double knot centered 1.5 in (4 cm) below.
7. Nearly gather all strands together to make an overhand knot, centered about 2 in. (5 cm) below the last row of double knots. Trim the cord ends to random lengths as desired. Make an overhand knot an inch or two (3 cm- 5 cm) from each end, and comb the end to make a tassel.
Bag Style 3:
1. Repeat step 1 from Bag Style 1, EXCEPT: Cut cords 9 ft. (2.75 m), tie the first overhand knot 40 inches from the end and make the braided section 12 in (30 cm).
2. Using four strands from one end, tie eleven single knots. This makes a twisted section about 1.5 in (4 cm) long. Repeat with the other four cords of this end. Using two strands from each set of single knots tie a double knot 1.25 in (3 cm) from the bottom of the twists. Repeat this entire step with the eight strands at the other end of the braid.
3. Bend the braid in half to bring the overhand knots together. Using two strands from each end, tie a double knot 1.25 in (3 cm) from the bottom of the twists. Repeat with the remaining four strands.
4. Hang the piece on a doorknob or other fixed object to make it easier to work. Take two cords from each of two adjacent knots from step 3 and make a double knot centered 1.5 in (4 cm) below. Repeat with the other three sets of cords, working around the piece. Repeat to make another row of double knots.
5. Tie six single knots directly below each double knot. Make one more double knot directly below each half twist formed by the single knots.
6. Tie two more sets of double knots. Finish as in Bag Style 2.
- Finished Size: Approximately 4" x 27" (per bag)
- Fiber Content: Cotton
Solid Oak: Chris Servidio and Steve Lord founded Solid Oak in October of 2008. Together, they offer over 50 years of business experience and knowledge in crafts, jewelry, and toys. They aim to produce affordable, reliably stylish, high-quality items for designers and artisans to choose and use in all of their fashion crafting endeavors.


Macrame Hanging Bags
- Finished Size: Approximately 4" x 27" (per bag)
- Fiber Content: Cotton
Solid Oak: Chris Servidio and Steve Lord founded Solid Oak in October of 2008. Together, they offer over 50 years of business experience and knowledge in crafts, jewelry, and toys. They aim to produce affordable, reliably stylish, high-quality items for designers and artisans to choose and use in all of their fashion crafting endeavors.