
Button Wall Art
Button Wall Art


These button wall art sets are the perfect decoration for any home. We’ve included two templates but there are enough buttons and canvas to make up to 4 designs that you can switch out of the frames to keep things fresh. Let your imagination run wild. Grab the kit materials and a scissors, pencil, black marker & hot glue gun and let’s get started!
Step-by-Step Instructions
Hummingbird Art:
1. Using the magnetic frame to measure your canvas, mark an 8x8in square on your canvas with a pencil. Cut out the square and set aside.

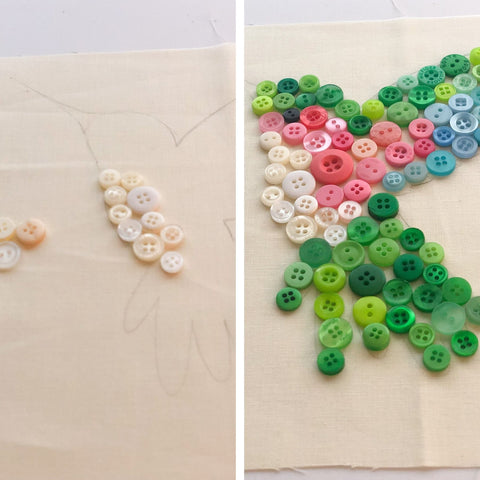
2. Use the hummingbird template to trace the outline on the center of the canvas.

3. Separate your buttons into the different colors you’ll be using so you have piles of each color. We used blues, greens, pinks and whites.
4. Start placing the buttons over your outline, trying to place the buttons in a pattern leaving little space between each button. (Side note: Don’t glue at this stage. You’ll want to make sure your buttons fit together before gluing them in place.)
5. Once your buttons are where you’d like them to be, start at the top and start gluing them in place with your glue gun. Be careful when lifting up your fingers so as not to shift and move the buttons. If your buttons do shift, make adjustments to put them back in place.

6. Use the black marker to draw the hummingbird’s beak.

7. After your buttons are glued in place, you’ll place one block of the magnetic frame underneath the end of the canvas and place the other block on top, sandwiching the canvas between the two blocks of wood.

8. Repeat step 7 for the top (which will include the twine on top to hang it.)
9. Hang the finished artwork using command hooks or nails.
Rainbow Art:
1. Using the magnetic frame to measure your canvas, mark an 8x8in square on your canvas with a pencil. Cut out the square and set aside.
2. Use the rainbow template to trace the outline on the center of the canvas.

3. Separate your buttons into the different colors you’ll be using so you have piles of each color. We used pinks, reds, oranges, and yellows.
4. Start placing the buttons over your outline, trying to place the buttons in a pattern leaving little space between each button. (Side note: Don’t glue at this stage. You’ll want to make sure your buttons fit together before gluing them in place.)

5. Once your buttons are where you’d like them to be, start at the top and start gluing them in place with your glue gun. Be careful when lifting up your fingers so as not to shift and move the buttons. If your buttons do shift, make adjustments to put them back in place.
6. After your buttons are glued in place, you’ll place one block of the magnetic frame underneath the end of the canvas and place the other block on top, sandwiching the canvas between the two blocks of wood.
7. Repeat step 6 for the top (which will include the twine on top to hang it.)
8. Hang the finished artwork using command hooks or nails.
- Finished Size: 8" x 8" Each
- Yards: 1 yd of Canvas


Button Wall Art
- Finished Size: 8" x 8" Each
- Yards: 1 yd of Canvas