
Embroidered Flower Artwork
Embroidered Flower Artwork


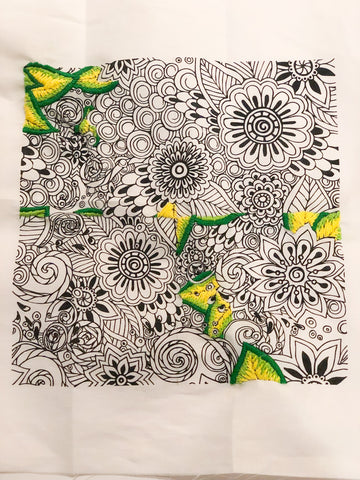
This fun, colorful embroidery artwork combines bright colors with unique floral design to make a beautiful statement art piece. This type of embroidery has been dubbed Zenbroidery™ as it is thought to be meditative as you stitch, coloring in all the shapes like a coloring book. You can choose to do all of it of just sections (like I did) to give it your own look. All you need is the content of the kit and a glue gun. Let’s get started!
Step-by-Step Instructions:
There are 3 main stitches that you’ll use throughout the pattern:
1. Satin stitch: Bring the needle up from the corner of any one of the edges of your shape. Take your needle down through the exactly opposite point on the facing edge. Bring the needle up through a point very close to the first point of emergence of the needle. Pull up the thread completely ensuring that the floss sits flat on the fabric. Repeat the process until the shape is completely filled. Take care to place the consecutive stitches close to each other and within the drawn guidelines to prevent unwanted gaps in the middle.
2. French Knot: First, you need to mark the spots where you want to make your French knots. String your embroidery needle with the thread of your chosen color. Make a tiny knot at its end to prevent the thread from running through the fabric you are working on. Pull the needle through the point where you want to make the French knot. The thread should be long enough for you to be able to point the needle back at the thread. Then hold the needle in your left hand (right hand in case you are left-hander) at the back of the thread and use your other hand to wrap the thread tightly around the needle. Next, poke the needle back through the fabric, close to the spot you pulled it through earlier. Make sure to keep a firm hold on the thread with your finger. Pull the needle all the way through at the back of the fabric, gently releasing the hold on the thread. Once the thread passes through to the back of the fabric, you will be left with a basic French knot on the right side of the embroidery.
3. Chain Stitch: Use a pencil to mark the places you want to make your chain stitches on. This makes it easier for you to keep your stitches in an even line. Use an embroidery ring to fasten the part of the fabric you will be working on. Now, pull the needle through the point where you want to begin your chain. Spread out the thread and take the needle back through the fabric, at around the same spot where you pulled it through earlier. Bring your needle back up on the line traced earlier, about 1.5 millimeters away from the point where you took it down. Gently pull the thread up to create a single loop on the right side of the fabric. You have now made your first chain stitch. Now to make the next chain, insert your needle through the point where you brought it up in the last step. Make sure to pull the needle from within the last stitch to create a neat chain (as shown in the diagram above), bringing it up a little way along the marked line as you did before. Pull the thread all the way to make your second stitch. Repeat the process until you complete working the whole marked line to finish your embroidery.
How to Make the Pattern:
1. Start by using the ruler and pencil to divide the canvas pattern into quarters. Draw lines dividing the pattern in half horizontally and vertically.

2. Using the dark green thread, use a satin stitch to fill in the pattern for the edge of the leaves.

3. Using a satin stitch, fill in the rest of the leaves with light green and yellow thread so that the middle of the leaf is yellow, then light green and the dark green for the outer edges of the leaves.
4. To make the round, spiral flowers, use a chain stitch to form each flower, switching between the light purple, dark purple, fuchsia, pink and light pink colors.

5. Use the light blue and royal blue colored thread to make the cone shaped flowers. Switch colors between each row as shown in the picture. Fill in the shape with a satin stitch.

6. For the thinner spirals, use a cross stitch to fill in the shape. Use the light pink and the fuschia colored thread to make them.

7. For the larger, bloomed flowers, use the red, orange, yellow, and brown threads to fill in the area. Use a satin stitch for these shapes.

8. There should be dots on the canvas that still need to be filled in. For this step, I used any color that would stand out against it (i.e. using blue thread so it would stand out against a green leaf or red so it would stand out against a pink spiral.) Use french knots to fill in that space, making the appearance of a small textured flower on those spots.
9. To finish your design, use satin stitches to fill in the remaining blank area. For this step, I also chose colors that helped the flowers stand out (yellow, purple and blue), but you can use whatever color you would like to fill in the background.

10. To mount the canvas on the wood board, line the artwork up so it is evenly spaced on the board. Use a hot glue gun to put a line of glue along the top back panel. Fold the canvas in place, gluing it to the back of the board. Repeat for the side parallel to the one you folded first.

11. For the remaining two sides, fold the corner down to make a triangle. Then, fold the triangles again towards the back of the board and glue into place. Repeat with the last side.

12. To hang the board, use a velcro Command strip.
- Finished Size: 10" x 10"
Design Works: Established in 1987,Design Works is woman owned, privately held business with devoted long term employees who are all proud to be manufacturing our wonderful products here in the USA. They focus on needlework, featuring welll known designers as Joan Elliott, Marilyn Robertson, Alan Giana and Ronald West just to name a few. One area of focus is Zenbroidery™ is a fun craft that combines the coloring book trend with traditional needlework. The concept is simple: Coloring book-style images are stamped onto fabric, and you “color” the picture with floss by stitching in between the lines.


Embroidered Flower Artwork
- Finished Size: 10" x 10"
Design Works: Established in 1987,Design Works is woman owned, privately held business with devoted long term employees who are all proud to be manufacturing our wonderful products here in the USA. They focus on needlework, featuring welll known designers as Joan Elliott, Marilyn Robertson, Alan Giana and Ronald West just to name a few. One area of focus is Zenbroidery™ is a fun craft that combines the coloring book trend with traditional needlework. The concept is simple: Coloring book-style images are stamped onto fabric, and you “color” the picture with floss by stitching in between the lines.